Is It Time For Cake?

It was great fun and super easy to make this birthday card using Mama Elephant stamp and dies….the stamp sets I have used are – stackable friends and big news and the die used for the background panel is the circular grid die..

I first created the front panel with Distress Inks and then die cut it before adding a dark mustard cardstock behind the panel…

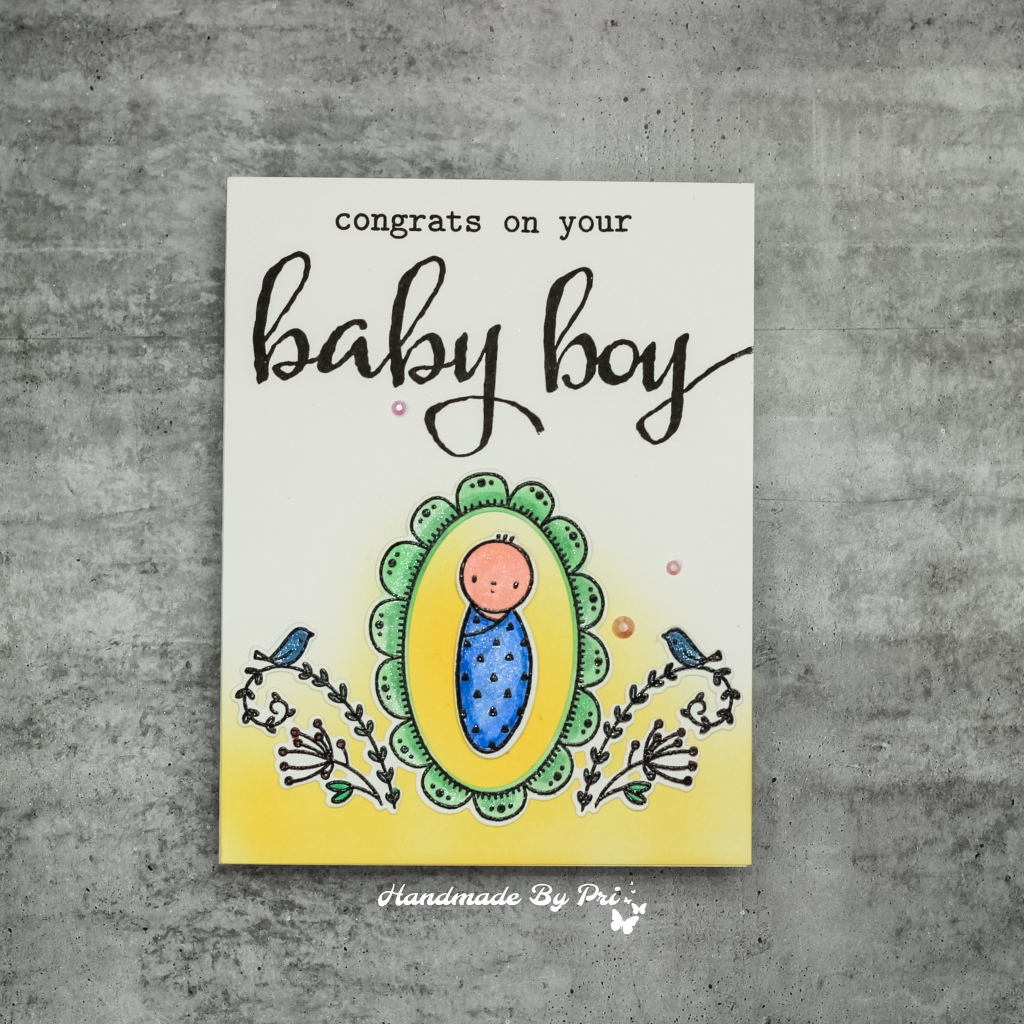
On a separate piece of cardstock, I stamped and clear heat embossed the images and then coloured them in before die cutting them…I added these to the card front and stamped the sentiments as well

Thank you for checking out my blog today…hope you are able to enjoy crafting these days…take care!!

Pri

Waffle Flower Baby Cards

Oh! I could’ve kept on making cards once I started with the Waffle Flower Little One Baby stamp set…it’s one of the most adorable baby stamp set I have ever used…and I am sure this will be my ‘go to’ stamp set for baby cards from now on…

I started by stamping and heat embossing all the images I needed for my cards…then coloured them in using alcohol markers and die cut them using the coordinating dies…

For the baby boy card, I sponged in a bit of mustard seed Distress Ink at the bottom of the front panel…I then adhered the coloured in and die cut images on it and stamped the sentiment at the top of the panel…the sentiment on this card is from an old Winnie And Walter stamp set called The Big, The Bold And Baby…

For the baby girl card, I lightly sponged in some salty ocean Distress Ink in the middle of the front panel and then placed all the stamped, coloured in and die cut images on it….

Thank you for stopping by my blog today…hope you will have a blessed and happy day ahead..!!

Pri

Angel Birthday Cards

I have used MFT Little Angels stamp set to create these 4 birthday cards….even though this was a part of the last year’s holiday stamps release, the images are simply too beautiful to only be used for one occasion..!!
Me And My Daily Papercraft Blog - Handmade By Pri

I have used Distress Inks and Oxide Inks to create all the background panels and then adhered those panels to a plain white card base…One of my cards also has a stenciled texture paste background and another one has a cloudy background…

Me And My Daily Papercraft Blog - Handmade By Pri

On a separate piece of white cardstock, I stamped and coloured in all the angel images and die cut them using the coordinating dies…

Me And My Daily Papercraft Blog - Handmade By Pri

I added the angel/angels to the card fronts using some foam squares….I added a die cut happy birthday sentiment on the first card and stamped sentiments for rest of the cards….

Me And My Daily Papercraft Blog - Handmade By Pri

I have used tiny pink stars embellishments in just one card but I applied Nuvo glaze to the wings of all the angels for a bit of shine ….

Me And My Daily Papercraft Blog - Handmade By Pri

Thanks heaps for stopping by today…Have a lovely & blessed day ahead….Happy crafting…!!
Pri 

Wishing You Happiness – Stamped Shaker Card

A couple of weeks ago I saw a tutorial by Jennifer McGuire where she made many adorable stamped shaker cards…you do need stamps with a coordinating die for this technique and it was quite a simple and easy process…I think I’ll be making a few more of these soon!!

Me And My Daily Papercraft Blog - Handmade By Pri

I stamped and gold heat embossed a large feather die on a white panel from Earth Has Music stamp set by Simon Says Stamp and coloured it in using Zig markers..I added a piece of white foam negative section which I die cut using the coordinating die….I added some gems and closed the shaker section using a piece of acetate…

Me And My Daily Papercraft Blog - Handmade By Pri

I used the coordinating die again to die cut on the front panel and adhered the feather shaker piece underneath…there are lots of ways to create/assemble this shaker card but this is just how I did this one…I added a bit of Distress Inks on the edges of the front panel and adhered a stamped sentiment strip as well as some gold confetti sequins to embellish my card…
Thank you so much for stopping by my blog….Hope you will have a cheerful and blessed day today..Happy crafting!!
Pri

Love Is In The Air – Two Valentine’s Day Cards

With Valentine’s Day just a couple of days from now, love is definitely in the air…and today I am sharing two cute cards that I made for Valentine’s Day..

For both my cards I created a similar background using Distress Inks and grassy edges stencil and mini cloud stencils by MFT….
I stamped the pig and cow  from Avery Elle Hogs and Kisses stamp set on a separate piece of white cardstock and coloured them in using my alcohol markers…I stamped a sentiment on the large heart and covered those with Nuvo Glaze for a shiny effect…
I stamped one more sentiment directly on the background panel….this sentiment is from Avery Elle Love Notes stamp set…I adhered the pig and cow to the card front and finally I stamped a couple of tiny red hearts and my cards were ready…

Me And My Daily Papercraft Blog - Handmade By Pri
Thank you for your visit today…I’m glad you stopped by my blog…Have a wonderful day ahead…!!
Pri

True Blue Aussie Santa!

If you didn’t know already, at Christmas we have summers in Australia…so we get the hot sun instead of snow during the festive season…so when I saw the Santa In The Sun stamp set from Clearly Besotted Stamps, I knew it would be perfect for some Aussie style chrissy cards…

Me And My Daily Papercraft Blog - Handmade By Pri

I created the backgrounds for my cards using Distress Inks and MFT stencils – making waves and grassy edges…I adhered strips of green and red glitter cardstock on one side of each panel…

Me And My Daily Papercraft Blog - Handmade By Pri

I stamped all the fun Santa images on a separate piece of white cardstock and coloured them in using alcohol markers and then die cut them using the coordinating dies…

Me And My Daily Papercraft Blog - Handmade By Pri

I adhered the front panels the white card bases and then adhered the die cut images using some adhesive foam squares…on a couple of cards I also added a die cut sun..

Me And My Daily Papercraft Blog - Handmade By Pri

I stamped the sentiments on the front panel using Versafine onyx black ink…two of the sentiments are from a Stamp-it stamp set and one from a Mama Elephant set…

Me And My Daily Papercraft Blog - Handmade By Pri

To embellish my cards I have used a few clear confetti sequins as the cards also get lots of sparkle from the red and green glitter cardstock…
Me And My Daily Papercraft Blog - Handmade By Pri

I am so glad you stopped by my blog…I had a ton of fun making these cards and I hope you liked them too…have a blessed and happy day today..!!
Pri

Diwali Cards Using Altenew Candle Light Stamp Set

Today I’m sharing 3 Diwali cards….Diwali is on the 7th of November this year and if you didn’t know already, it is the biggest Hindu festival – also known as the festival of lights…and I was so happy when Altenew came up with the most versatile stamp set called Candle Light which has images of some layering candles, tealights and an earthen lamp as well as some really wonderful sentiments..I had been waiting for a set like this for quite sometime now..

For all my cards, I stamped the layering stamp for the lamp and the flame on a piece of white cardstock using Altenew crisp inks…for the lamp I have used mocha, sand dunes, rocky shore, and limestone shade and for the flames I have used citrus burst, fresh lemon and autumn blaze….I have die cut these with the coordinating dies and in a couple of the die cuts had to trim off a small section for the flame…

Me And My Daily Papercraft Blog - Handmade By Pri

My first card was inspired by Jennfer Rzasa and I kept is fairly simple as I wanted to see if these lamps would look okay with the flame on one side…and I think it does…well, I started by creating the front panel of my card by first stamping the small mandala pattern using wild honey oxide ink and heat embossed it with some clear embossing powder…I then applied various Distress Inks on this panel – squeezed lemonade, mustard seed and dried marigold…I stamped and heat embossed the sentiment and then adhered this panel to the card base…I added the die cut lamp and embellished my card with some plain gold confetti sequins..

Me And My Daily Papercraft Blog - Handmade By Pri
For my second card, I have used a square stencil to create the focal point in the background..I used the following Distress inks for that – blueprint sketch, salty ocean and tumbled glass…I then stamped and heat embossed the sentiment before adhering the front panel to the card base…I used adhesive foam squared to attach the lamp and then added a few tiny gold star sequins as embellishments..
Me And My Daily Papercraft Blog - Handmade By Pri

Now my third card wasn’t planned but it is my favourite…and it looks much better than it does in the pictures…I dry embossed a frosted gold cardstock piece using a paisley embossing folder and the adhered it to a plain white card base…then I stamped and white heat embossed the sentiment on an orange panel and adhered it to the card front and then adhered the lamp die cut…and finally to decorate this card I have used a few orange rhinestones.. 
Here are a few more pictures of my cards…

Me And My Daily Papercraft Blog - Handmade By Pri

Me And My Daily Papercraft Blog - Handmade By Pri

Me And My Daily Papercraft Blog - Handmade By Pri

Thank you for stopping by my blog today…if you celebrate Diwali – then I wish you a happy Diwali and prosperous year ahead and if you know someone who does celebrate Diwali, do wish them….have a wonderful and crafty day ahead…!!

Pri

Lawn Fawn Birthday Fairies

I was in the mood to create a bright and cheerful card and thought these cute Lawn Fawn fairies would be just perfect for it…I also used the woodgrain background die for the background panel, on which I applied some oxide inks for a magical look..

Me And My Daily Papercraft Blog - Handmade By Pri

I started by die cutting the front panel from white cardstock and then applied the following Distress oxide inks on it – wilted violet, shaded lilac and picked raspberry…I adhered this panel to a plain white card base and set it aside until I had all the other elements ready…

Me And My Daily Papercraft Blog - Handmade By Pri

On a separate piece of  bristol smooth cardstock, I stamped all the images using Versafine black ink and the heat embossed them all using some clear embossing powder…I coloured these images using the Zig markers and die cut them using the coordinating dies…
I adhered all the images using some adhesive foam and also added a stamped sentiment strip on my card…to embellish my card I have simply added some tiny gold star sequins..

Me And My Daily Papercraft Blog - Handmade By Pri

Thank you for your visit today…I’m glad you stopped by my blog…Have a happy, crafty and wonderful day ahead…!!

Pri

Stay Awesome My Friend

I am sharing a card for all my awesome friends today…I have connected with so many amazing and talented crafters all over the world and even though I haven’t been able to post anything on my blog for almost a month now, these lovely friends have been inspiring me with their beautiful creations…
I have been making cards – and even started on Christmas cards – but haven’t been able to click pictures of these cards for my blog posts…but with the days getting longer, I am hoping that I will be able to keep up with things from now on…

Me And My Daily Papercraft Blog - Handmade By Pri

I first used Distress inks and the city scene stencil to create the background for my card…I have used chipped sapphire, hickory smoke and tumbled glass shades here…I adhered this panel to a plain white card base…
I stamped the hot air balloon on a separate piece of white cardstock and die cut it with the coordinating die and placed it on the card front using some adhesive foam squares for dimension….I stamped the sentiment on a thin strip of white cardstock and adhered it on the card as well…and finally I added a few clear confetti sequins to embellish my card..

Me And My Daily Papercraft Blog - Handmade By Pri

Thank you so much for your visit today…I’m glad you stopped by my blog…Have a wonderful and happy day ahead…!!

Pri